|
|
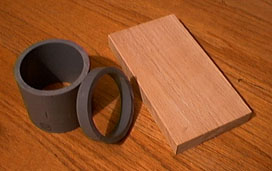
First, we need to gather materials to use for the base and sleeves in
the tooling set. I used a piece of oak with dimensions of 3.5" X 6" X 5/8".
The sleeves are cut from a piece of 2.5 inch schedule 40 PVC conduit
pipe. One is a 1/2 inch slice and the other is 2.5 inches long. Each
piece of conduit has been cut along its length by using a coping saw with
a very narrow kerf.
|
|
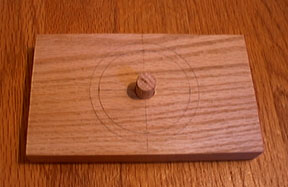
A 1/2 inch hole is drilled at the center of a 2.5 inch circle
on the base block. A short length of dowel is placed in the
hole so that it protrudes to a height of 1/2 inch. The other end of
the dowel is flush with the bottom of the base block.
|
|
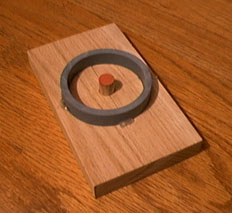
The inside of the 1/2 inch slice of conduit must be coated with
vaseline or bearing grease to act as a mold release. It is then
tacked in place by using hot glue. The exposed surface of the small
dowel should also be coated with mold release. This assembly can now
be used to mold a raised cylinder onto the base block.
|
|
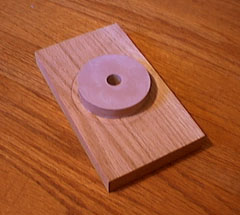
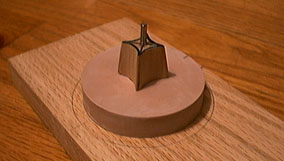
I chose to use auto body putty because it's cheap and readily available.
A $5.00 can of Bondo will be sufficient for this entire set of tools.
Another option would be epoxy or some other resin system. Of course, if
you have a wood lathe, you could make all the necessary shapes from wood
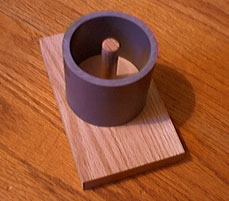
and skip all the fuss of casting them. When you are done, the base should
look like this picture. You should retain the small length of dowel as
part of this tool set. It will be used to fill the hole in the base when
you are pressing a comet which has no central core.
|
|
The 2.5 inch length of PVC sleeve is now used in a similar manner to
cast a rammer piston with a hole in it. It is placed over the base cylinder
to hold it in place, so it shouldn't be necessary to tack it down with hot
glue, as before. Again, the inside of the sleeve
must be treated with mold release grease. The dowel is cut to be even with
the height of the sleeve and is wrapped with a few layers of tape so the
hole in the piston will be a little larger than the dowel. I also placed
a circle of wax paper in the bottom to protect the base cylinder. The
wax paper and the dowel are also treated with mold release. Unless you
are extremely skillful at using Bondo, I suggest you cast the rammer piston
in several steps instead of with one batch of putty. Bondo will gel within
4 minutes, which gives you very little time to mix it, get it into the mold
and get out the air bubbles before it's too late. I used three small batches
of 80 grams each. Again, if anyone could suggest a better resin system, I
would love to hear about it.
|
|
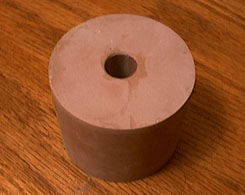
With a little luck, your rammer piston should look like this.
|

|
These rammers have been formed using the same techniques described above.
The solid one on the left is used to press comets that have no
central core. The one on the right is used to create the interface
between priming compositions and hard to ignite comet compositions, such as
flitter and other high metal formulas. The shape of the rammer face produces
ridges of comet composition that are covered with prime composition. These
ridges are much easier to raise to ignition temperature than a flat surface
would be. This rammer was made by cutting pieces of hardwood to form the
ridges and gluing them on the face of the rammer with epoxy.
|
|
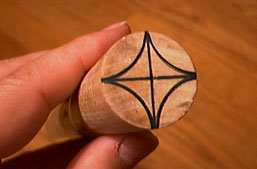
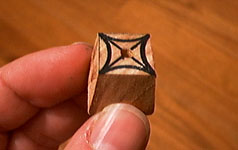
The last part of the tool set is the crossette insert. I started by marking
the face of a 1 inch hardwood dowel as shown. The arcs are drawn with the aid
of another piece of 1 inch diameter dowel. A hole is drilled in the
center to accommodate the insertion of a tapered pin later. A length of 11/16
inch of the drilled dowel is cut from the end.
|
|
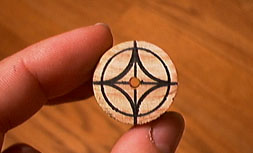
The opposite face of the dowel piece is now marked with the same pattern
inside a 3/4 inch circle. This time, the arcs are drawn using a piece of
3/4 inch dowel. The pattern must be precisely aligned with the pattern on
the opposite face.
|
|
Straight cuts are made which create a square on each face of the dowel, one
being smaller than the other. This creates the desired taper in the insert.
|
|
The curved surfaces are carved out by any of several possible techniques. A
Dremmel tool would work nicely. I used a straight edge bit in a router mounted
in a router table. Even hand carving with a pocket knife would work if you
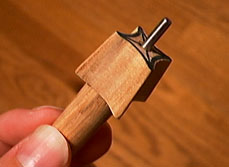
have a little patience. To finish the crossette insert, the completed dowel
piece is glued to a short length of a 1/2 inch dowel and the tapered pin is
set in place with epoxy. The length of this pin will determine when the
crossette will burst while in flight. I make the pin a little long and shorten
it to taste after experimenting with a few test comets. Finally, the shaped
part of the insert should be sealed with a good finish of some kind. I used
a thin coating of epoxy followed by light sanding.
|
|
In use, the insert is placed in the base, as shown, to form the burst charge
cavity in the end of the comet body. The shape of the cavity is specifically
designed to ensure that the crossette will burst into 4 equal pieces, creating
a beautiful glittering cross in the sky.
|
|
|
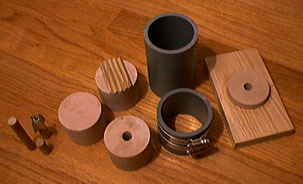
This is the complete set of comet tooling for 3 inch comets. There is a short dowel
to fill the hole in the base cylinder when pressing solid comets. Another longer
length of dowel is used to press comet "cookies" with a hole in them for cored
comets. These cookies dry out much sooner than entire comets would. They are then
stacked and glued together with nitrocellulose lacquer. Next there is the crossette
insert followed by three specialized rammers. One for pressing cored cookies, one
for pressing solid cookies and one for priming flitter comets. There are two PVC
sleeve lengths. One is used to press the cookies, which are 1/2 to 5/8 inches thick.
The longer sleeve is used to press crossette sections and complete comets when the
cookie method is not used. Both sleeves use hose clamps to prevent expansion during
pressing. Last in line is the base, which has a 1/2 inch hole in the center of the
raised cylinder. When you are ready to used these tools to create breath-taking comets,
check the forthcoming projects pages to see them in actual use.
|
|