|
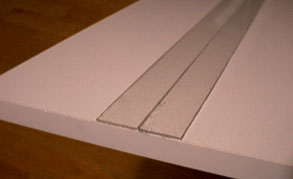 |
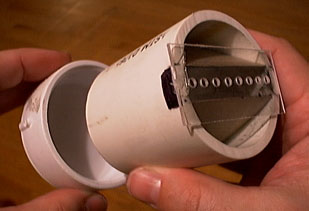
This design uses 3 foot long strips of material to form masks that aid in
accurately placing black powder grains on 2 inch packing tape. Acrylic was
chosen as the material in this case, but many other alternatives are possible.
The 3 foot length was chosen because most of my 3 inch shells, comets and mines
use a leader fuse about this long. However, this contraption can be used to
make sticky match of any desired length. The first step in building it is to
cut two strips of 1/16 inch thick acrylic. They are 3 feet long and just a
whisker less than 1 inch wide. A table saw or radial arm saw is recommended for
making these cuts very straight and accurate. The cut edges are sanded gently
to smooth and clean them from cutting burrs. They are then mounted down the
center of a very straight foundation board as shown. The board, in this case,
is a plastic surfaced, 10 inch by 3 foot shelf board, like the one used for the
star cutting board. It costs about $6.00 at most home improvement and hardware
stores. The two strips of acrylic are mounted such that the space between them
is about the width of a utility knife blade. The function of the space is to
guide the knife blade as it is used to split a two inch wide strip of packing
tape into two 1 inch strips of tape.
|
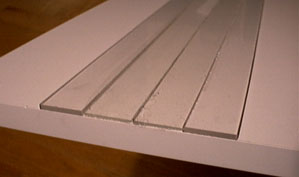 |
Two 1 inch wide strips of 1/8 inch thick acrylic are now cut to the same
length of 3 feet. Next, two more strips are cut for the masks which have a width
of 2 3/4 inches. (These are also from 1/8 inch acrylic stock.) Finally, 4 stop
tabs are cut to a size of 1 inch by 2 inches. You are now done with all the
acrylic cutting required for this project. You may sweep up the floor
and brush the acrylic shavings out or your hair. The two long 1 inch wide strips
are mounted beside the first strips on the mounting board. You should now have 4
strips mounted on the board which form a 2 inch wide recessed track down the
middle of it.
|
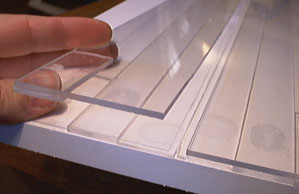 |
The masks are now made by gluing the stop tabs to the 2 3/4 inch mask
strips. The picture shows the placement of the tabs at one end of the mask
strips. The other stop tabs are glued at the opposite ends of the masks.
Instead of two separate tabs, a single 3 foot long strip could have been used
to attach along the edges of the mask strips. The placement of these tabs (or
complete strips, if used) determines the distance that the masks will overhang
into the recess mentioned above. If the tabs are glued flush with one edge of
masks, as shown, the overhang will be 3/4 inch. This results in a 1/2 inch wide
portion of the 2 inch packing tape being exposed for the placement of powder
grains. Finding the right glue for these steps might be a challenge. Hot glue
and epoxy will not adhere to the acrylic very well. I finally settled on
something called "Zap a Dap a Goo II". It is a sealant and adhesive that is
a little less viscous than silicone sealant.
|
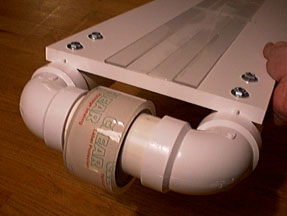 |
Next, some method must be contrived to mount a roll of 2 inch packing tape at
the end of the mounting board. The roll is mounted below the working surface of
the board to achieve a little tension in the tape as it rises and folds over the
end of the board into the recessed track. This helps assure that the tape will
lay very flat inside the track. The tape mounting system shown is built from
2 inch PVC parts. The pipes are attached to the board with bolts which hold them
very securely in place. The elbow joints are not glued together, but rely only
on the friction fit of the joint, which is considerably strong. This way, the
mount can be disassembled to add a new roll of tape. In actual use, the end of
the mounting board, where the tape roll is mounted, is suspended over the side of
the table or work bench surface so that the board can lay flat.
|
 |
The tooling is completed by making a nifty little shaker to evenly distribute
the grains of black powder on the packing tape. This one was made from a
short piece of 2 inch PVC pipe. An end cap serves as a lid. A piece of acrylic
with 1/8 inch holes was glued on the other end. Small, cardboard baffles were
installed inside the pipe section to constrain the black powder grains to fall
through the holes, but this is probably not necessary. If you don't want to be
this fancy, the same function as the shaker can likely be accomplished by using
a small scoop or spoon to sprinkle BP grains on the tape.
|
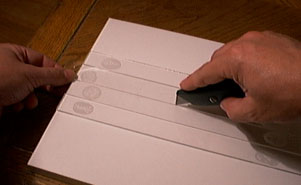 |
Now let's take a look at how this tooling is used to make "perfect sticky match."
First, a 3 foot length of 2 inch packing tape is drawn from the roll. Unfortunately,
the clear packing tape used in this demonstration doesn't show up in the photos
very well, but I prefer the clear tape over other varieties. It is placed
inside the recessed track and held down at the free end by one hand. The other hand
is used to run a utility knife along the groove in the recess to split the tape
into two strips of 1 inch wide tape. This split section of tape is cut from the
roll and the two separate pieces are hung from the edge of the work bench by
sticking one end to the edge. There are several reasons for going to this trouble.
The first is that 1 inch wide tape is hard to find. The second is that it's handy to
only have to purchase one size of tape to make your sticky match. In other words,
your inventory management is simplified. This splitting procedure is repeated until
the desired number of strips has been made.
|
 |
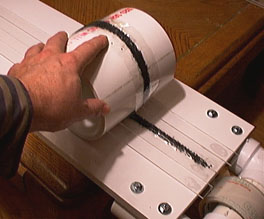
Now another 3 foot length of tape is drawn from the roll and placed in the
recessed track. The free end is attached to the take-up cylinder which, in this
case, is a piece of 5 inch PVC pipe. The pipe is placed in a cradle at the end
of the match board. This cradle is merely a piece of 1/2 inch plywood with a
1 inch wide groove cut in it to hold the cylinder stationary. If I were to
build another sticky match board, I would make it about 6 inches longer and
just cut the cradle groove into the board itself, rather than make the cradle
from a separate piece of wood. The pipe in the cradle with the tape attached
at the bottom is rotated until the tape has a little tension to hold it very
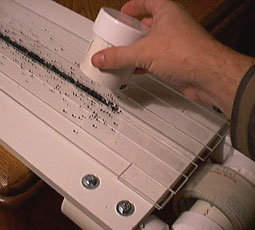
flat in the recess. Now, the masks are put in place. The shaker is used to evenly
sprinkle black powder grains along the exposed sticky portion of tape. I use
powder which ranges from -10 to +20 mesh. This is roughly equivalent to 3FA
commercial powder. The entire exposed sticky surface of the tape does not have
to be covered with grains. It's surprising how sparse the dispersion can be
without affecting the performance of the final product. A wide putty knife
is then used to wipe any grains which are laying on top of the masks onto the
tape. Now the masks have performed their function and can be removed.
|
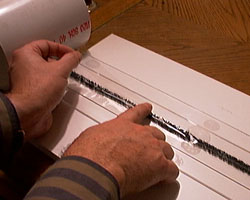 |
If this is the first section of a long length of match, a length of visco is
placed with one end overlapping the grains and the other
end protruding out where it can be ignited. The length of the visco depends
on the desired "retirement time" when the end user conforms to the age old
counsel to "light fuse and retire." A section of the 1 inch wide tape is now
applied over the visco and the 1/2 inch wide train of powder grains. There should
be about 1/4 inch of overlap on each side of the powder train as the top strip of
tape is applied. Positioning should be done carefully because you only get one
chance to get it right. A section of the powder train about 1/2 inch long is left
uncovered for the joint to the next section of match, if desired.
|
 |
If a piece of match longer than 3 feet is desired, then the finished portion of
match is rolled up on the take-up cylinder. A new section of match is started
by drawing out more tape and placing the take-up reel back in its cradle. The
cycle of drawing out tape, applying powder and placing the cover tape over it,
is repeated until the final desired length is achieved. I seldom make a length
of match more than 9 feet long but, theoretically, it should be possible to
make any length needed.
|
|
A few final tips are in order before this page is finished. When using this
sticky match as a leader for a shell, I insert a short length of black match or
home-made thermalite in the end to maintain the fire a little longer in the
vicinity of the lift powder. Where the sticky part of the leader match is not
needed, I fold the sides over on the powder train to form a fuse that is much
narrower than the original match width. If loading and lighting a single item
at a time into a mortar, I use the match as is. When I pre-load several items
at once in a mortar rack, I don't want sparks from one to unintentionally ignite
the leader of its neighbor. In this case I use a single layer of paper or foil
sleeve to add protection to the portion of the leader match that protrudes from
the mortar. Well, there you have it... I have completely revealed the secret of
making perfect sticky match. It's so easy, I sometimes make up a bunch just to
light for fun. A 10 or 20 foot length of match going off in a split second is
an impressive effect all by itself.
|
|