
This section gives some basic electronics and robotics information along with helpful links. I also detail a lot of my projects. For most of them I've included schematics. I use ExpressSCH for drawing them and ExpressPCB for designing circuit boards. They are a free package from expresspcb.com. You can download for free and get your boards professionally manufactured for very reasonable prices. Of course, with the final layout you can also etch your own boards at home if you choose.
June 18, 2011
My Second Microcontroller Project
My second project, also utilizing an ATTINY13, expanded on the first by adding a second LED and push button switches to activate/deactivate them. It was based on a simple project from a book I had bought, but wasn't much more than my first project so I modified it. One button causes the LEDs to alternately flash and the other button causes them to pulse back and forth from dim to bright. It taught me how to use software PWM (pulse width modulation) which will eventually be useful for controlling servos. I got a lot of help from forum members over at AVRFreaks.net. It's a great resource for anyone interested in AVR. After building it on the breadboard, I wired it up permanently on a small perfboard which was then screwed directly onto a 3 AAA battery holder. I plan to eventually etch my own board for this, so I've included the PCB tracing if you want to try.
Here is the code for the project, including a simple technique for debouncing the switches. I've commented it fully to make it pretty clear:
/*

 *

 *  Created on: June 17, 2011

 *  Author: Brian Redmond

 */


#include<util/delay.h>

#include<avr/io.h>

#include <avr/interrupt.h>

#include<inttypes.h>


#ifndef F_CPU

     #define F_CPU 1000000UL

#endif


unsigned char x=0; // for status of blinking

static unsigned char b=1; // starting (and MIN) value for OCR0A

static uint8_t dir; // for stepping b which is added to OCR0A. Will change to down when b reaches 254 and back to up when b reaches 1

unsigned char z=0; // for status of PWM fading


enum { UP, DOWN };


ISR(TIM0_COMPA_vect) // Turns off both LEDs when TCNT0 matches OCR0A

{

   PORTB=0x1B;

}


ISR(TIM0_OVF_vect) // Turns on both LEDs on TCNT0 overflow

{

   PORTB=((0<<3) | (0<<4)); // +5 V turns off LEDs because they are sinked, not sourced, so a 0 at the bit turns them on

   switch (dir) // increments b (LED brightness) to 254 then decrements to 1

   {

      case UP:

         if(++b == 254)

            dir=DOWN;

         break;


      case DOWN:

         if(--b==1)

            dir=UP;

         break;

   }

   OCR0A=b;

}


int main(void)

{

   DDRB = 0x18; // Pins 2 and 3 as output (5 and 6 are input)

   PORTB = 0x1B; // +5V to pins 2 and 3 (turns off sinked LEDs), enable internal resistors on pins 5 and 6


   while(1)

   {

      if(!(PINB&(0x01))) // Blinking LEDs - button 1

      {

         _delay_ms(10);

         while(!(PINB&(0x01)));

         _delay_ms(10);

         cli(); // Disable interrupts

         z=0; // Must reset pulsing variable in case blink button was pressed while pulsing was on

         if(x==0) // Blinking is off so start blinking

         {

            x=1;

            PORTB = 0x0B; // Turn on LED 1 while turning off LED 2

            while((PINB&(0x01)) && (PINB&(0x02))) // Loop until either button is pressed

               {

                  PORTB^=(0x08 | 0x10); // Toggle LEDs

                  _delay_ms(500);

               }

         }

         else // Blinking is on, stop

         {

            x=0;

            PORTB=0x1B; // Turn both LEDs off

         }

      }


      if(!(PINB&(0x02))) // Pulsing LEDs - button 2

      {

         _delay_ms(10);

         while(!(PINB&(0x02)));

         _delay_ms(10);

         x=0; // Must reset blinking variables in case pulse button was pressed while blinking was on

         dir=UP; // Start LEDs dim and pulse up

         b=1;

         if(z==0) // LEDs are not pulsing

         {

            z=1;

            PORTB=0x1B; // Make sure both LEDs are off first

            TIMSK0 |= ((1<<OCIE0A) | (1<<TOIE0)); // Use compare and overflow interrupts

            OCR0A=b;

            TCCR0B = ((1<<CS00) | (1<<CS01)); // Prescaler 64

            TCNT0=0; // Reset counter

            sei(); // Enable interrupts

            while((PINB&(0x01)) && (PINB&(0x02))) // Loop until either button is pressed. Nothing in loop since everything is handled by interrupts

            {

            }

         }


         else // LEDs are pulsing, stop

         {

            cli(); // Disable interrupts

            z=0; // Reset z to not pulsing

            PORTB=0x1B; // Turn off both LEDs

         }

      }

   }

}
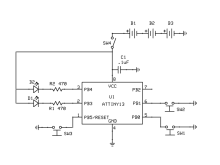
This schematic shows the switches for toggling the LEDs as well as a reset switch, all powered by 3 AAA batteries. All three switches are momentary pushbutton.
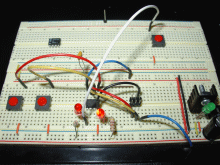
Here is the breadboard layout.
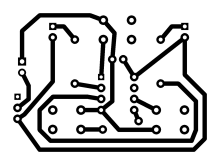
Here is the PCB tracing for home etching. The buttons are 6mm x 6mm B3F series (Digikey part number SW403-ND). These are smaller than the buttons I used because I had these already on hand. Full-size PNG file is here. Printed size should be 2 inches by 1.5 inches.
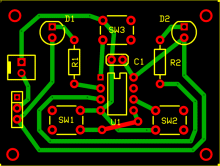 Here is the PCB layout. C1 is a 0.1uF capacitor and the resistors I used were 470 ohm. The 3-holed component is a power switch and the square connector is a Molex KK for power in from the batteries. The red connection shows where you'll need a top-layer jumper wire if you etch at home. If you want to download the actual ExpressPCB file, you can do so here.
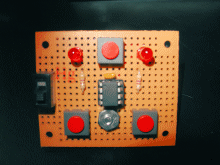
Here is the finished project. Home etching would eliminate the rat's nest of point to point wires underneath.
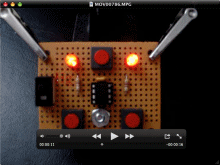
Here's a video of the finished project.
Other Projects
An audio controlled servo - June 1, 2011My first microcontroller project - May 17, 2011
I built a motion controlled cat fountain - March 24, 2011
A 555 timer project - December 17, 2009
A basic line-following robot - March 11, 2009


